A few months ago, I heard about a new browser called Arc. Built by The Browser Company, Arc brings a refreshing aesthetic to the rather dull business of web browsers. So I thought: how hard would it be to build a new browser?
Turns out it’s pretty complicated.
Recently, I’ve been building a toy web browser alongside the browser.engineering book. My browser supports basic HTML and CSS features alongside tabs and navigation history. In this post, I’ll go into the internals of how the browser reads, parses, and displays content on the internet.
Overview
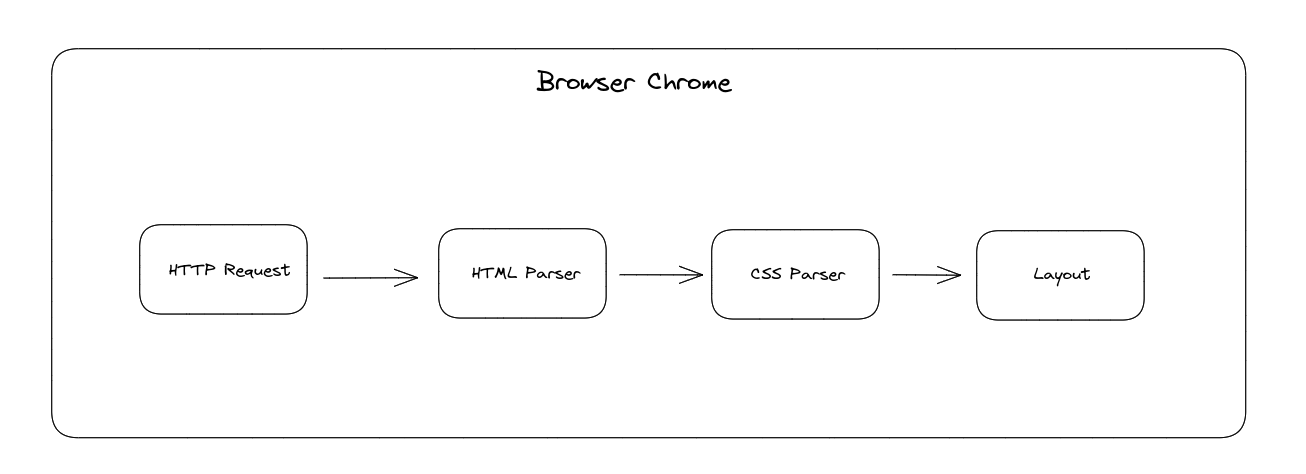
The toy browser consists of a few main components:
- Networking layer
- HTML parser
- CSS parser
- Page layout
- Browser chrome
HTTP Request
In the first step, the browser directly sends an HTTP(s) request to the website server through a socket connection, and the server responds with a list of headers and the content body. If the scheme is HTTPs, we need to wrap the socket in an SSL context to communicate with the server. With Python, this is pretty straightforward:
s = socket.socket(
	family=socket.AF_INET,
	type=socket.SOCK_STREAM,
	proto=socket.IPPROTO_TCP,
)
s.connect(("example.com", 80))

if scheme == "https":
	ctx = ssl.create_default_context()
	s = ctx.wrap_socket(s, server_hostname="example.com")
The server can define a number of headers in addition to the content body. Notably, a few include:
- Content-Encoding: the type of encoding in the response, such as gzip or compressed
- Transfer-Encoding: how the response is sent. For example, when the transfer-encoding is chunked, the body is sent in a series of data chunks rather than all at once.
There are plenty of additional headers in the HTTP/1.1 specification (see Mozilla’s documentation), but it would take quite some time to implement all of these features! For now, our browser supports gzip compression and chunked transfer-encoding, which lets us browse most of the websites online today.
HTML Parser
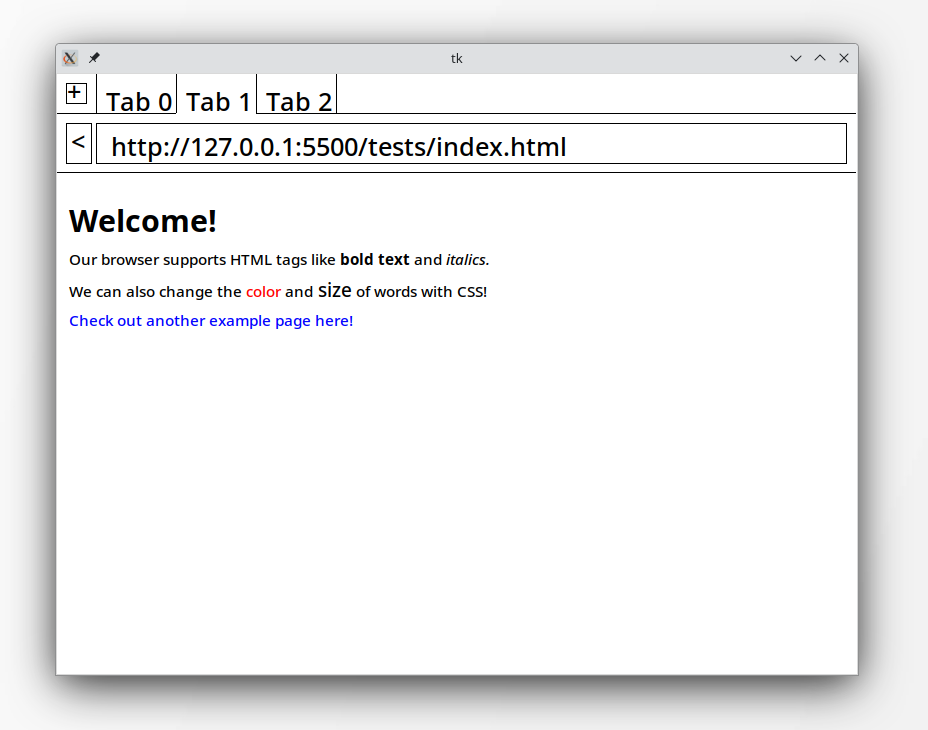
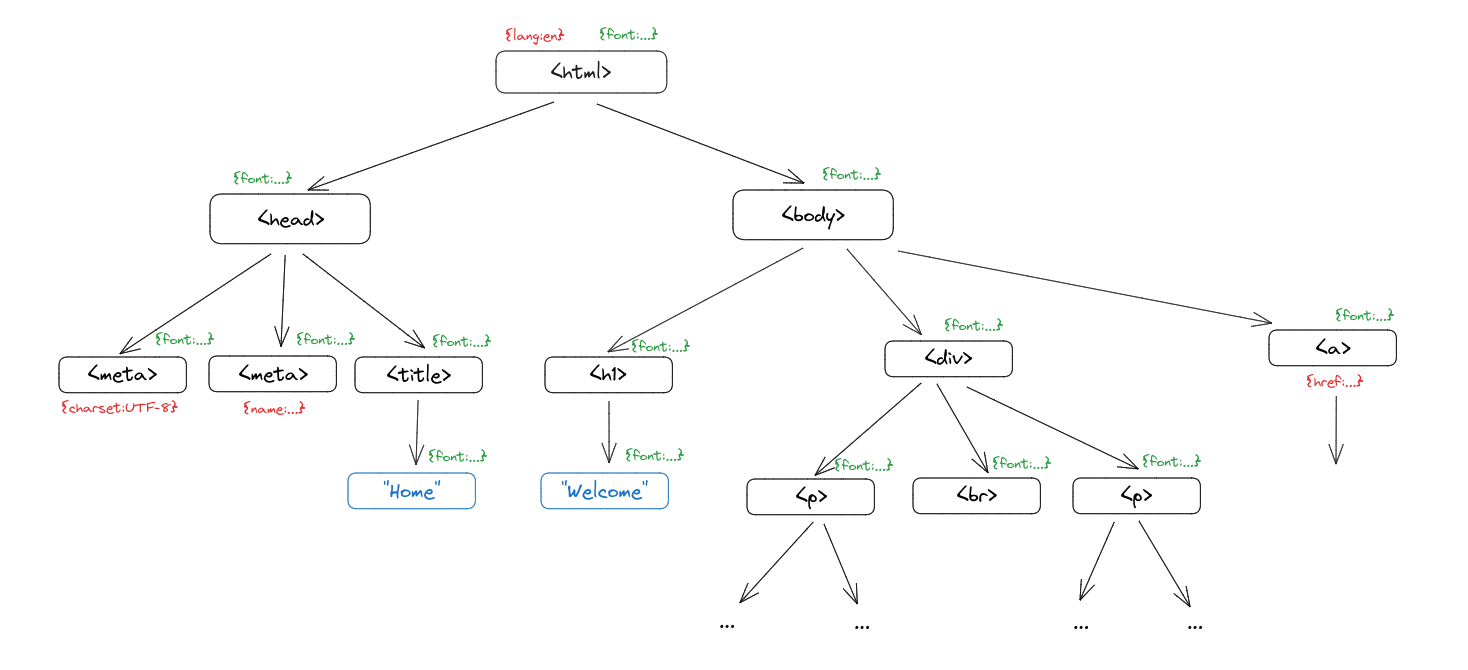
Once we receive the raw content body, we parse the HTML into a friendlier format for later steps. For example, consider the following page:
<!DOCTYPE html>
<html lang="en">
<head>
    <meta charset="UTF-8">
    <meta name="viewport" content="width=device-width, initial-scale=1.0">
    <title>Home</title>
</head>
<body>
    <h1>
        Welcome!
    </h1>
    <div>
        <p>Our browser supports HTML tags like <b>bold text</b> and <i>italics.</i></p>
        <br>
        <p>We can also change the <span style="color:red;">color</span> and <span style="font-size:20px;">size</span> of words with CSS!</p>
    </div>

    <a href="https://example.com">Check out another example page here!</a>
</body>
</html>
Since HTML elements can contain nested elements, which may each contain additional elements, we use a tree structure to represent each HTML node.
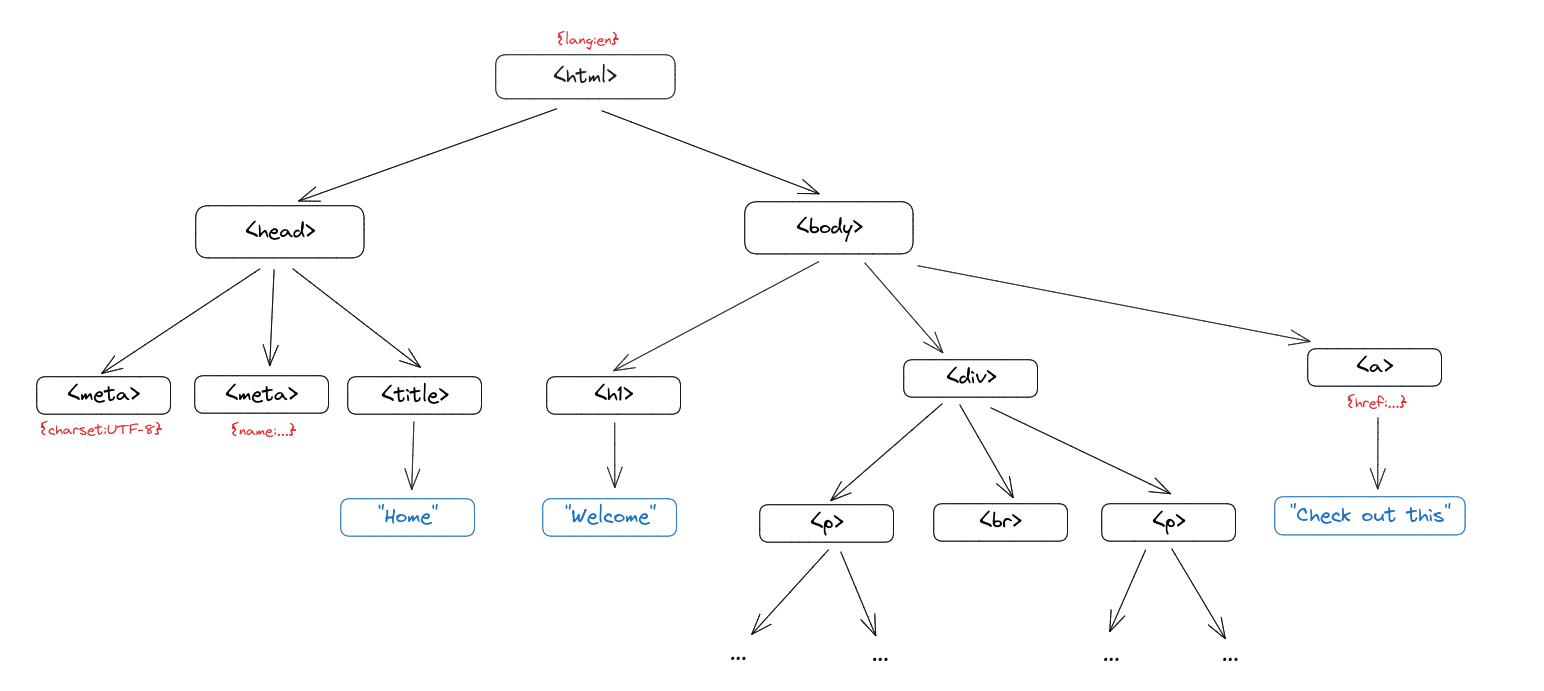 In this tree, every HTML element like
 <p> or <head> has a list of children, attributes, and a parent node. We use two separate classes to distinguish between elements and raw text (the nodes in blue).
class Text:
    def __init__(self, text, parent):
        self.text = text
        # Text elements have no children, but we include this for simplicity
        self.children = []
        self.parent = parent

class Element:
    def __init__(self, tag, attributes, parent):
        self.tag = tag
        self.attributes = attributes
        self.children = []
        self.parent = parent
Well, how do we construct this tree from the raw HTML response?
Our parser consists of two components. First, we iterate through the HTML character-by-character. We keep track of when we’re in an angle-bracket pair, then add the corresponding text or tags to our current tree.
for c in self.body:
	if c == "<":
		in_tag = True
		if text:
			self.add_text(text)
		text = ""
	elif c == ">":
		in_tag = False
		self.add_tag(text)
		text = ""
	else:
		text += c

if not in_tag and text:
	self.add_text(text)
For the text above, this sequence of operations looks something like:
...
add_tag('body')
add_tag('h1')
add_text('Welcome!')
add_tag('/h1')
add_tag('div')
add_tag('p')
add_text('Our browser supports HTML tags like ')
add_tag('b')
add_tag('bold text')
add_tag('/b')
...
In order to construct a tree, we keep track of the currently unfinished elements whose close tags have not yet appeared. Let’s look more closely at what happens in adding the h1 tag:
add_tag('h1')
add_text('Welcome!')
add_tag('/h1')
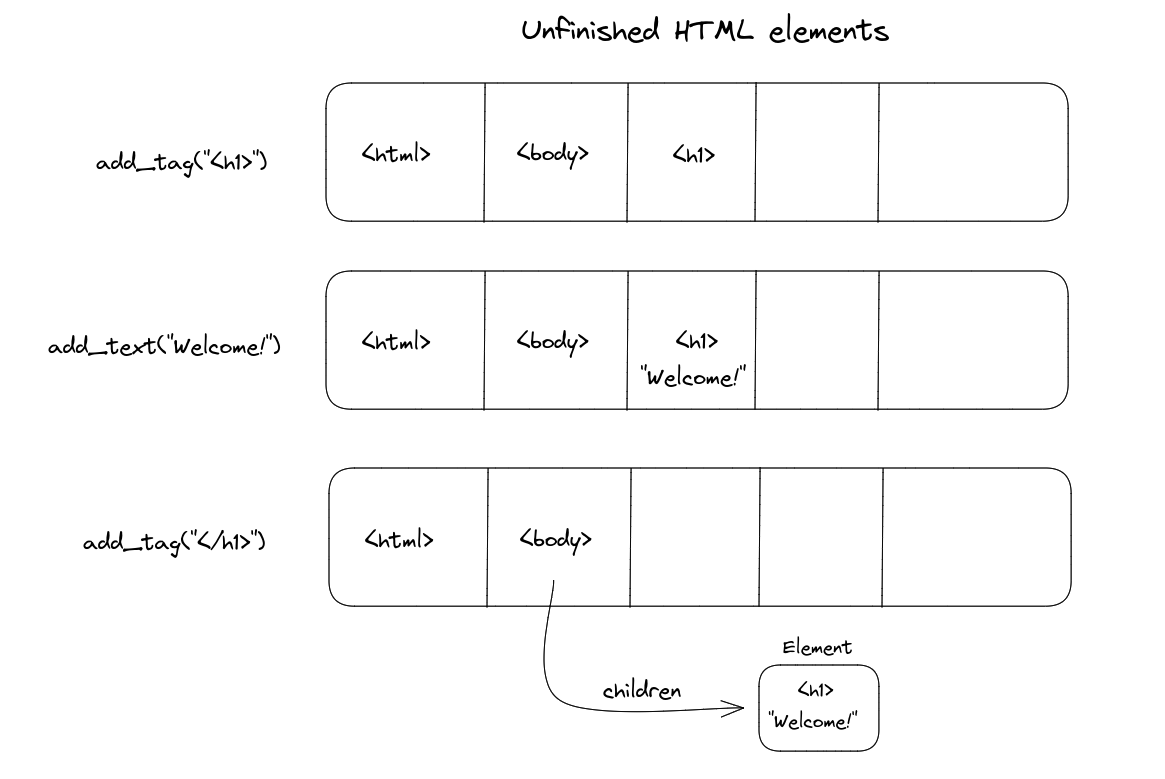
- Adding
<h1>: we’re introducing a new opening element, so we simply append the tag to the unfinished list - Adding
"Welcome!": since we parsed some text, we add it under the current element (which is<h1>). Implementation-wise, the<h1>Eleent now has a child Text object. - Adding
</h1>: now that we’ve closed off the tag, we add it as a child of the previous element and remove it from the unfinished list.
Repeating this process through all text and tag elements gives us our HTML tree.
CSS Parser
Unfortunately, pure HTML doesn’t get us very far in web design. If we want colours, sizes, margins, and all the flare of modern websites, we’ll need to support CSS. Similar to HTML, the CSS specification is HUGE; we’ll only implement a small subset of features like font-size, color, and background.
Fundamentally, CSS tells us how to style specific elements. We can declare these styles inline within an HTML element or through CSS selectors like:
h1 > p {
	font-size: 300%;
	color: blue;
}
So, we want a parser which can handle CSS selector queries and produce a key-value mapping for a given CSS body.

LL Parser
Our parser is an LL(1) parser, which processes the CSS 1 token at a time in a top-down strategy. We implement functions that advance through the text for a specific type of data, such as:
# Advance through the current whitespace characters
def whitespace(self):
	while self.i < len(self.s) and self.s[self.i].isspace():
		self.i += 1


# Advance through the current word
def word(self):
	start = self.i
	while self.i < len(self.s):
		if self.s[self.i].isalnum() or self.s[self.i] in "#-.%":
			self.i += 1
		else:
			break
	if start == self.i:
		raise Exception("Error when parsing word")
	return self.s[start : self.i]
The cool part is that we can join a bunch of these smaller helper methods to parse large constructs like selectors, bodies, and entire CSS files. For example, parsing a CSS property-value pair can be done with a combination of the functions above:
# Advance through the current property-value pair
def pair(self):
	prop = self.word()
	self.whitespace()
	self.literal(":")
	self.whitespace()
	value = self.word()
	return prop.lower(), value
Let’s look at the CSS example in the diagram.
h1 p {
	font-size: 300%;
	color: blue;
}
- We first parse the selector (
h1 p) by advancing through words until we reach the open brace symbol. - Next, we parse each pair repeatedly (see above) until we reach the closing brace symbol
- Repeat step 1 until we reach the end of the file.
After parsing the CSS file, we’ll have a list of rules: these are mappings of selectors to styling maps. This may look like
# Apply font-size 300% to all h1 elements
(Selector("h1"), {font-size: 300%})

# Apply blue colour to all p descendants of a div
(DescendantSelector("div p"), {color: blue})
Finally, we iterate through the HTML tree recursively. For each element:
- Inherit all style properties from the parent element
- Go through all CSS rules and apply the ones that match the selector
- Add any inline styling to the element
- Resolve units, e.g. change all “em” and “%” to a fixed “px” size
These steps are done in this order so that inline styles take priority over CSS rules, while CSS rules override any parent styles.
 By the end of this, all elements in the HTML tree will have a
 style attribute.
Layout Rendering
Now comes the fun part: we have an HTML tree with the desired styling, but we must calculate positions, sizes, and more to layout the website on the screen.
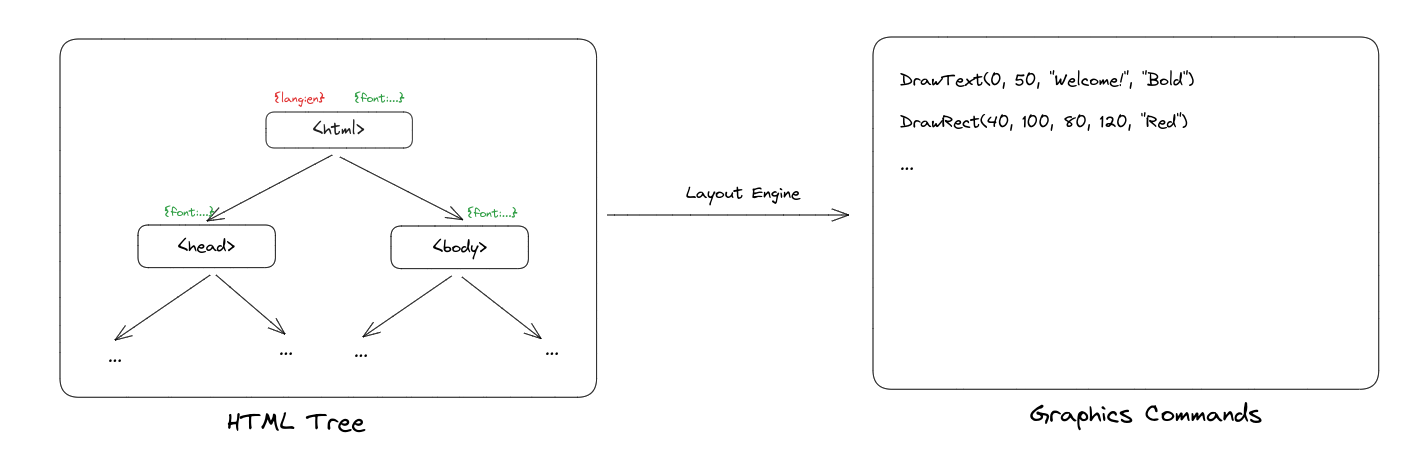 To do this, we construct a Layout Tree. This tree follows a similar structure to the HTML tree – each layout object corresponding to an HTML element. We recursively traverse the HTML tree and compute layout information such as size and position for each element.
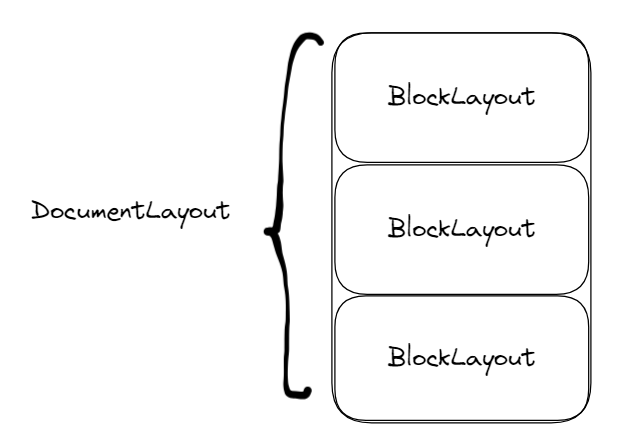
Our layout tree consists of four types of layout objects:
DocumentLayout: root node of the layout tree, initializes overall width and heightBlockLayout: represents a block of text, such as a paragraph or title headerLineLayout: represents a physical line of textTextLayout: represents a single word
Each of these objects may contain information like:
- x, y position
- width, height
- parent layout object
- children layout object(s)
Let’s see some concrete examples.
DocumentLayout
The DocumentLayout object represents the root of the layout tree and initializes properties like width and position. We need this root layout object, because the remaining types of layout objects will inherit these properties from their parent.
class DocumentLayout:
    def __init__(self, node):
        self.node = node
        self.parent = None
        self.children = []

    def layout(self):
        child = BlockLayout(self.node, self, None)
        self.children.append(child)
        self.x = HSTEP
        self.y = VSTEP
        self.width = WIDTH - 2 * HSTEP
        child.layout()
        self.height = child.height + 2 * VSTEP
Note that the Document’s height depends on the child layout object’s height (see below), so we can only compute self.height after we recursively layout the child.
BlockLayout
BlockLayout objects represent HTML elements such as <b> or <h1>. They can either contain nested BlockLayout children (non-leaf node) or text (a leaf node).
Our browser supports two display modes: block and inline. Block elements will always start on a new line and inherit the full width of the parent. In contrast, inline elements will continue on the current line and take up only the width necessary to display the text. There is a clearly defined list of block elements, which includes tags like <h5> and <p>.
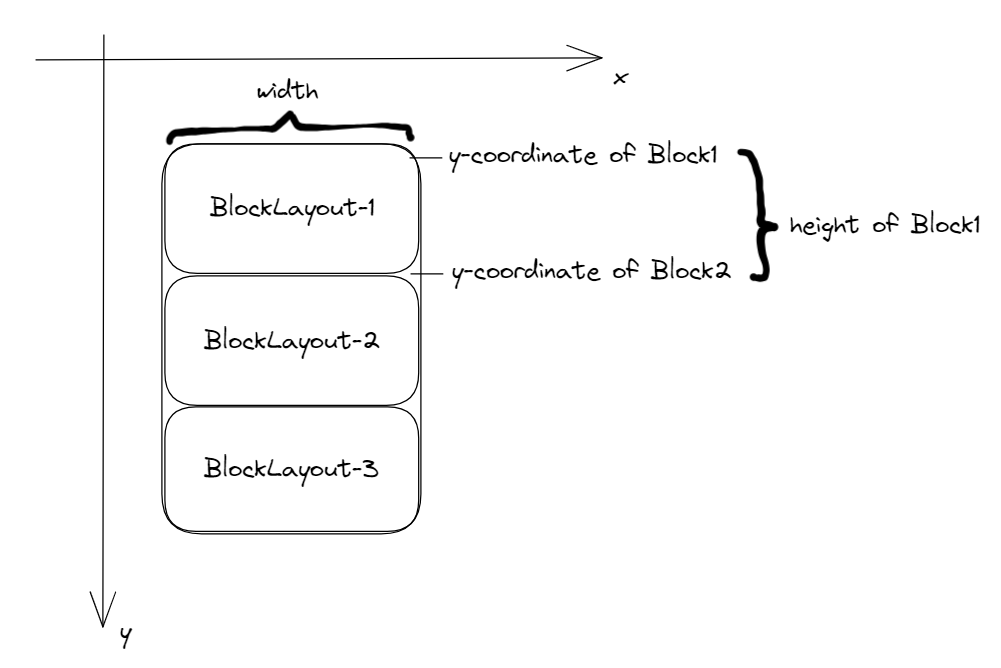
All of our elements will inherit their x-position and width from their parent element. For the y-coordinate, we have two cases:
- If the element is the first child: the y-coordinate will be the parent’s (see Block 1)
- If the element has a previous sibling block: the y-coordinate will be the sum of the previous sibling’s y-coordinate and height (see Block 2)
def layout(self):
	self.width = self.parent.width
	self.x = self.parent.x

	if self.previous:
		self.y = self.previous.y + self.previous.height
	else:
		self.y = self.parent.y
	...
Display: block
If the element has display block, we create a BlockLayout for every child in the HTML tree of the current node, adding them as children to the current BlockLayout object.
def layout(self):
	...
	if mode == "block":
		previous = None
		# Create a BlockLayout for every child in the HTML tree of the current node
		for child in self.node.children:
			next = BlockLayout(child, self, previous)
			self.children.append(next)
			previous = next
We keep track of the previous BlockLayout sibling, so that we can compute y-coordinates as explained above. Finally, after we determine the width, height, and positions for each of our children layout objects, we calculate the height of the current object:
self.height = sum([child.height for child in self.children])
Display: inline
If the element has display inline, we recursively layout all of its text. To do so, we introduce two new layout objects: LineLayout and TextLayout.
The idea is to layout words one-by-one and keep track of their x positions along the current display line. Once the x-position exceeds the width of the parent object, we create a new line and continue. At the end, the BlockLayout will consist of multiple physical lines represented by LineLayout objects, which each contain words represented by TextLayout:
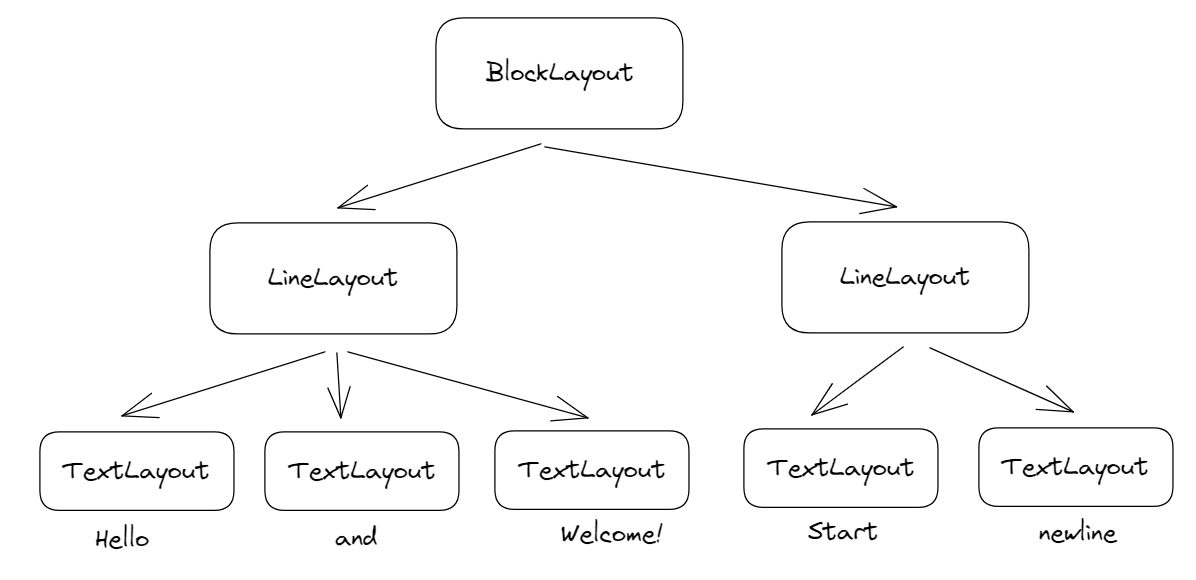
There are a few tricky calculations to perform when calculating the line-height and y-coordinates of words: most libraries will draw words given a top-left coordinate, but we would like to display words on the same baseline-level.
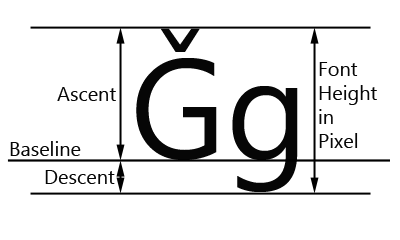 We first calculate the baseline’s y-coordinate by finding the maximum ascent over the entire line and summing it with the current y-coordinate.
metrics = [word.font.metrics() for word in self.children]
max_ascent = max([metric["ascent"] for metric in metrics])
baseline = self.y + 1.25 * max_ascent
Then, for each word in the line, we subtract the baseline y-coordinate from the word’s ascent to get the word’s desired y-coordinate. The height of the line is the sum of the maximum ascent and descent, multiplied by some constant factor for space in-between lines.
for word in self.children:
	word.y = baseline - word.font.metrics("ascent")

self.height = 1.25 * (max_ascent + max_descent)
Finally, after creating the layout tree, we produce the commands for the GUI library (tkinter) to draw the elements to screen. For example, our DrawText command displays words (TextLayout objects):
class DrawText:
	...
    # Draws text to the given canvas
    def execute(self, scroll, canvas):
        canvas.create_text(
            self.left,
            self.top - scroll,
            text=self.text,
            anchor="nw",
            font=self.font,
            fill=self.color,
        )
Browser Chrome
After all these steps – HTML & CSS parsing, layout & rendering – we now have a browser that displays webpages! However, one essential aspect missing is the browser chrome – icons, buttons, tab list, search bar, and more – that defines modern browsers.
To implement multi-tab support and navigation, we must distinguish between a Browser and a Tab object:
- The Browser object will receive events such as clicks and mouse scrolls, then route them to the current active tab
- The Tab object will respond to these requests and display the current contents of the page
In the Browser object, we keep track of all the tabs that are open. When an event occurs, we update only the current active tab and re-render the browser components:
class Browser:
	...
	def handle_up(self, e):
		self.tabs[self.active_tab].scrollup()
		self.draw()

    def draw(self):
        self.canvas.delete("all")
        self.tabs[self.active_tab].draw(self.canvas)

        # Draw the browser chrome (tabs, icons, buttons, etc.)
        for cmd in self.paint_chrome():
            cmd.execute(0, self.canvas)
If the user clicks in the browser chrome region (e.g. back button), we perform whatever required action (e.g. load previous page from history). Otherwise, we route the click to the current tab. All of this gives us our lovely tab-navigation system!
Conclusion
We covered a few components of modern web browsers: HTTP requests, HTML/CSS parsing, and layout/rendering. Throughout these steps, a tree of HTML/Layout objects represents the current page, with each step adding information such as styling and layout position.
Modern browsers rely on engines such as Blink (Chrome) and WebKit (Safari) to perform these steps and much more. For example, Blink contains:
All browsers nowadays also support client-side JavaScript execution, accomplished through JavaScript engines such as v8 that compile and execute JavaScript using C++.
I would highly recommend browser.engineering if you found this post interesting: the course walks through building a browser step-by-step, from parsers to DOM models to GPU-powered animations.
To me, browsers are where algorithms come to life. A browser contains a rendering engine more complex and powerful than any computer game; a full networking stack; clever data structures and parallel programming techniques; a virtual machine, an interpreted language, and a JIT; a world-class security sandbox; and a uniquely dynamic system for storing data. – Pavel Panchekha & Chris Harrelson
Thanks for reading!